Kid/Guest Bathroom Facelift
One of the things on our DIY house projects list for before the baby is born was to redo the kid/guest bathroom. It wasn’t a huge undertaking, since the previous owners of our house gutted both full bathrooms within the last five years or so. There wasn’t anything horribly wrong with the bathroom, except that it was totally not our style. (I think you’ll see why.)
Anyway, I “broke ground” on this project just a few weeks after my appendicitis surgery in April. I think it all took about four weeks to do (utilizing just evenings and weekend naptimes), but then we had a few more weeks of pulling together the final details, too. And finally, it all came together… and I LOVE IT.

It was hard for me to get “after” photos of this room since it doesn’t get much natural light this time of year. When I took the before photos in April, the trees hadn’t all filled in yet, but now that all of the leaves are here, the window doesn’t get direct sunlight really ever. But I cranked up the ISO on my camera and made do. Ignore the “noise” in the photos. :)
Before we get to more “after” photos, let me show you what we were starting with. The previous homeowners were in their 50s or early 60s, but they had their taste was of people much older, if you ask me. They redid a lot of things in the house fairly recently—it’s just unfortunate that a lot of their choices were pretty ugly. OK, enough words… I’ll let the pictures do the talking:

The walls were a soft sage-y green, not terrible. But the vanity, although of good quality, was medium-oak colored. And I hate oak. The vanity top was creamy/beige… just like everything else in this bathroom. BOR-ING.
That brings us to this monstrosity:

If you’re me, your first reaction to seeing this was “WHAT IN THE HELL?!” This gigantic medicine cabinet/light fixture combination had.to.go.

The other big problem was that all of the fixtures were two-toned brass and shiny chrome. Gag.


My first order of business was to eradicate the oak. I decided to do this by painting the vanity. I found several tutorials for how to do so through Pinterest and Google. Not surprisingly, it was basically the same process as we followed when painting our kitchen cabinets. Degloss, sand, prime, paint. I can’t even remember how many coats I did now. I want to say it was only one coat of primer, but three coats of paint since it was such a dark color. Of course, I removed the doors and drawer fronts to prime and paint, and could only do one side at a time (then had to let it dry fully before flipping over), so… you can imagine how long that took! Thankfully it was only four small pieces, not the multitude of doors and drawer fronts like the kitchen. So in comparison to that, this seemed simple.
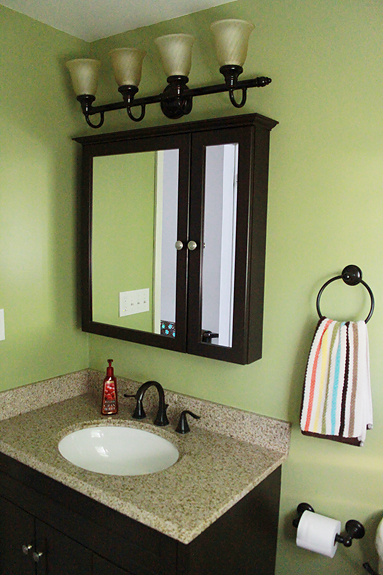
After the vanity was transformed, we ripped apart the rest of the bathroom. All of the chrome/brass fixtures were removed and thrown away. I patched and sanded all of the holes left behind, then painted the walls. We decided to stick with green, but a more earthy/nature-like green. We had already picked out the shower curtain and we were matching/coordinating the paint color with that, actually.


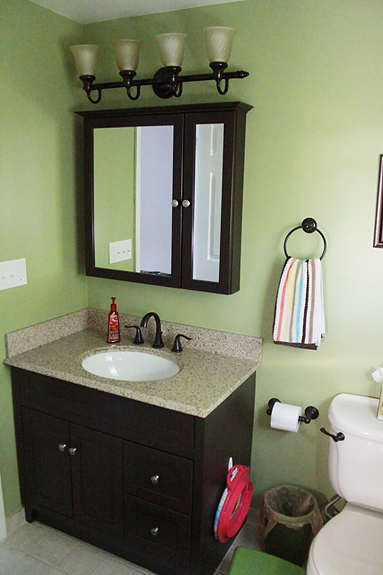
Then it was time for new everything. Fixtures—we decided to go with oil-rubbed bronze in here because it better fit with our overall color scheme. New medicine cabinet (I couldn’t give up the storage!), light fixture… and a granite vanity top. It wasn’t in our original plans to do a new vanity top, but once night when I was browsing Lowe’s website for fixtures, I came across their ready-made granite vanity tops and on a whim, we decided to upgrade. Dude, I’m so glad we did. This makes such a HUGE difference in this bathroom.

LOVE.IT.

We also did new knobs for the vanity, which came out really well, by the way. It’s amazing what a little quart of paint can do!


Haha, oops, please excuse the appearance of a PLUNGER. Seriously, no one can ever really see that nook back there, but of course, when I stand in the tub to take photos from this angle… there it is. Whoops. Whatever. This is real life, folks… not a Pottery Barn catalog! :) Continuing with that thought, you can see Nora’s little potty seat and hook, and step stool. It is a kids’ bathroom, after all.
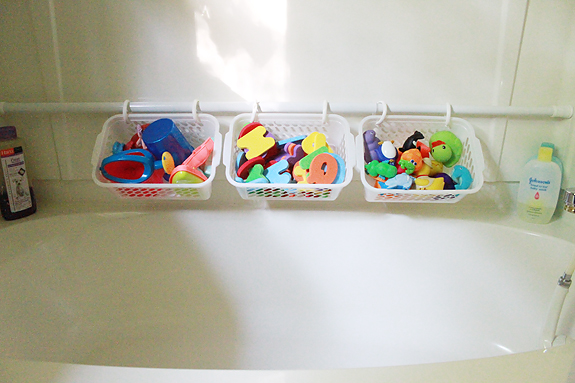
Another problem I aimed to solve with this makeover was bath toy storage. The little pod things or hanging mesh bags that they design for bath toys were not cutting it anymore. Nora has too many. And we were just leaving them hanging out in the bottom of the tub after every bath. Not acceptable. Thankfully, I came across an awesome solution on Pinterest, and made it come to life in this shower:

WINNING! It’s amazing what a tension rod, a few plastic shower hooks, and three baskets can do, huh?

38 Responses to Kid/Guest Bathroom Facelift
Leave a Reply Cancel reply
About
 I'm Heather. I'm 33 and have been married to Michael for seven years. Together, we have two beautiful little girls we love more than anything, and a miniature dachshund who drives us crazy. I'm a full-time working mom who has very little time for my own "stuff" these days, like home improvement, cooking/baking, cake decorating, and photography. Despite the team not making the playoffs since 1999, I'm STILL a Buffalo Bills fan, which I think speaks to my loyalty AND sense of humor. I can't wait to pick up the pace with travel again some day... you know, when we're done being ruled by tiny fists. Welcome to my blog.
The Address
heatherdriveblog@yahoo.comHeather Drive Archives
Post Categories


This looks great! It makes a huge difference, especially the countertops! I also love the print on the shower curtain. Helps to bring a little “kid” into the room!
love it!!! looks soooo good!!
Looks great! You guys did an awesome job
I love what you’ve done here! It is so fresh and vibrant – what a transformation! When we moved into our house, the previuos owners had installed high quality neutral marble bathrooms. They are pretty, but a bit characterless and it is hard to inject personality into something which is meant to look so sleek and shiny! I love your re-do, and the solution to Nora’s bath toy overflow? Genius!
What a great makeover! I love it! I also love the toy storage idea in the bathtub! We are getting to the point where our toy caddy isnt cutting it either and I just might have to do something like this!!
I love this!! The oil rubbed bronze looks great with the green walls. I have a similar color wall in my laundry room! It’s a very bright, happy color. Thanks for sharing!!
[…] Heather Drive‘s bathroom facelift included this ingenious solution: a tension rod mounted behind the bath, with plastic baskets hung via shower curtain rungs. […]
Can you please post the name and brand of the paint you used? I really like the color. Thanks!
[…] Heather Drive‘s bathroom facelift included this ingenious solution: a tension rod mounted behind the bath, with plastic baskets hung via shower curtain rungs. […]
Beautiful redo! What brand and color paint did you use? Thanks!
Thanks! We used Sherwin-Williams Duration paint. I can’t remember the name of color. I’ll try to remember to go dig it out of the basement to look.
OK, update: The color is called Ryegrass. Hope that helps.
Would really appreciate knowing where you purchased the medicine cabinet. Thanks!
It was purchased at Home Depot.
Where is the picture of the toy baskets/tension rod??
Oops….it finally loaded.
I love this bathroom!
Love the beautiful work you did:-) love your chatty style but some of the comments made me uncomfortable at the beginning We may be blah but we make the best of what we have. Enjoy your bathroom and thank you for sharing the transformation Love it :-)
Sorry if I offended you, Debbie, but obviously everything expressed here is my own opinion. I didn’t mean to make sweeping generalizations, either. My mom and dad are in their 50s and 60s, my grandparents are in their 80s, etc. and I actually think that for the most part, they have great taste. And I agree that everyone always makes the best of what they have. Like, for instance, the peach master bathroom that we’re still living with, nearly three years later. :) The previous homeowners at our house JUST did these bathrooms a few years back, and what I was really commenting on was how they picked finishes and fixtures that were very out of style today, and definitely not in line with our personal taste. I’m sure they thought it was very beautiful, though, and hey, they were living here at the time, not me. But we did not care for it—again, only our opinion—and made A LOT of cosmetic changes around here. This bathroom is only a tiny dent in what we’ve done with this place!
THis is the problem with blogging and trying to do a good thing. Why on earth would YOU be “uncomfortable” about something she said about the bathroom? Seriously? Wow! I know I’m responding very late to this but I couldn’t resist. It’s A BATHROOM not a therapy session.
I hope you didn’t actually throw the old fixtures and towel rods in the trash. What about donating to habitat for humanity or some other worthy cause? Your budget obviously allows you to update rooms for cosmetic reasons, but some people can’t update a leaking faucet or other broken part of their home due to economic reasons. With good fortune comes responsibility.
Actually, Lisa, we donated what Volunteers of America would take—which as I recall, was the countertop/sink/faucet combo, as well as the mirror/medicine cabinet/light fixture. And I’ll have you know that Habitat for Humanity actually doesn’t even accept faucets anymore, and as far as I know, they have never accepted bathroom hardware. So, the cheap towel bars, toilet paper holder, and flush handle? They did end up in the trash. I’m sorry you feel the need to bash me for that. You actually know very little of my economic status, recycling habits, and philanthropic efforts, so in the future, maybe you can refrain from being so judgmental?
Now I really can’t resist… Thank you Heather for letting Lisa know how responsible you are with your good fortune and your allowable budget.
I typically put all my leftovers in the side of the road so people “in need” can pick it up, at least the effort is made then. Seriously Lisa? What this is not a blog about how to recycle for the less fortunate, it’s about painting a cabinet and hanging up some toys.
I really enjoyed your remodeling pictures and the story until I saw read your responses to Debbie and Lisa. Their posts did not warrant such defensive responses.
Sarah, sorry you feel that way. With Debbie, I actually felt badly that she mistook my tone and was just trying to explain my point of view. With Lisa, I thought her comment was very rude and judgmental and I make no apologies for how I chose to respond to it. Thanks for stopping by! If you read more of the content on my blog, you might find that I’m actually a nice, normal person.
I love how the vanity turned out! Can you please share the color and brand of paint?
Beautiful remodel! Can I ask, how did you install the tension rod? I was just wondering if it was secure, since I know how little hands love to pull on things…and by that, I mean my own little one ;)
Hi Brittney! We just twisted it as tightly as we could before locking it. It’s very secure—it’s never fallen!
[…] Whole Bathroom Facelift – An inspiring show of DIY dedication + tip for bath toys […]
How do you keep the baskets from tipping over to much. I’m having g a heck of a time. Lol
[…] Photo: Heather Drive […]
[…] Suspension Rod Bath Toy Storage – Don’t like sewing? Try this effective bath toy storage solution that can simply be pieced together from an expansion rod and baskets. Scroll down to the bottom of the page for a lovely photo. […]
[…] over them or they would just stay in the tub until the next bubble bath. I came across this great solution that kept the toys organized, dry and out of the way. All you need is a tension rode, a couple […]
[…] Tension Rod, Hooks and Plastic Baskets – Attach plastic baskets with plastic shower curtain hooks to a tension rod. Tension rods can be found at spotlight. Image via Heather Drive. […]
[…] Tension rod bathtub storage – So smart! Use a tension rod with hanging baskets to keep all the tub toys together and ready to dry. […]
Where did you get the shower curtain? It’s adorable! =)
It’s from Target a few years ago!
Hi Heather! I just saw your post and I really liked it. Thank you for sharing! I saw you posted the color and brand of paint used on the walls, would you mind sharing what you used on the vanity? I love it! Thanks again =).